
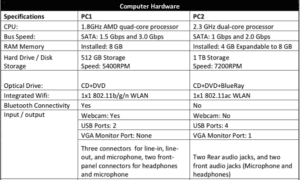
 Computer component specifications should be listed on every component you put into your DIY computer build. This information can provide valuable information on the parts you select, just as a computer you purchase at a local store usually has a list of product specifications on the box or near the display counter.
The specifications listed on a pre-built computer are usually about what is installed, and one or two main features of each part. Components however, can have many specifications that apply only to that one part and they are generally not all listed on pre-built systems.
There’s a lot of lingo in component specifications that varies – sometimes greatly – between different manufacturers and distributors. Some you should pay great attention to when making decisions about what components to purchase, and others are nice to know about, but won’t effect whether or not your parts will work with each other once together.
Here we will try to break down the important specifications to look at for different parts and an explanation of what it is. If you find any that are missing, please feel free to point it out to us so we can update the information for everyone’s benefit.
Main Component [Hardware] Parts of Every Computer
Here are the main hardware parts that make every computer work;
- Motherboard
- Power Supply
- CPU/Processor
- Memory
- SSD/HDD – Storage Drive
- Graphics – On-board (CPU supported) or Dedicated Card
Even without a case, if you were to mount these parts on say, a piece of plywood (yes, I’ve seen that!), you would have yourself a basic, open-air, working, computer.
Now, having all the main parts for your computer build, how would you know if all those things would work together? A large part of answering that question is by looking at the specifications of each part and determining if they will work with other parts.
Sounds like a lot, I know. But, after looking at things for a while, you start to see a pattern of what works and what won’t. And, which specifications are more important to look at. Once you see that two components should work together, one last confirmation would be to check the manufacturer’s website for documentation.
Motherboard Specifications
The motherboard is crucial to your computer build. Think of it as the skeleton that holds other parts, (such as the heart, lungs, brain, etc.) and it allows them to work together. Components fit into specific areas of the motherboard either by wired connections, slots, or sockets.
Slot
Slots on a motherboard are generally where PCI expansion cards will attach to the board, and/or memory (RAM) sticks. Memory will only work in slots specific to memory, while PCI expansion slots can be used with any expansion card you have. A dedicated graphics card usually goes closest to the CPU on most motherboards, into the PCI express slot, which is larger than a PCIe slot for other types of cards such as network, USB, sound, etc. There may be more than one larger slot, which is for connecting more than one dedicated graphics card to the motherboard.
The latest memory slots available on motherboards support DDR4 and the newest DDR5 standards. Though when deciding on your build, be sure to check the motherboard manufacturer’s website for the RAM supported by your board. Usually referred to as the QVL (Qualified Vendors List), it will provide information on what memory types, speeds and brands have been tested and known to work with the motherboard. The QVL is not a definitive list, it only shows what memory it has tested and knows to work with their product. Similar memory not on the list can still work. It’s just not guaranteed 100%.
If you decide to build with less expensive, older parts, be sure you check all the motherboard documentation to ensure you are able to get the parts that will work. You may find that slightly older hardware is no longer available unless you purchase used parts. It might also be that the parts are older connection types, which may not be available on newer hardware.
Socket
The socket on the motherboard is where the CPU/Processor will be secured. Sockets fit specific makes, models, and generation of CPU’s, so as part of your decision process this will be an important item to take note of. AMD processors will not work on an Intel based board and vice-versa.
A newer connection also termed socket is the newer M.2 solid state devices, which would replace the need for a typical HDD or SSD drive. It looks more like a piece of memory, and is very fast, but the connections are at the end of the device, rather than the length of the part like on memory sticks. Not all motherboards support M.2 slots, but many newer models from the last couple years generally have at least one.
Wired
Most of the remaining things that connect to your motherboard are wired and go in specific places, such as the board power connection, CPU power connection, case and CPU fans, optical and storage drives (SATA connections on newer boards), sound, case buttons and controls, and USB connections to the case. There can be others, but they’re less common and are usually only found on old motherboards.
Common Motherboard Specifications Defined
CPU – Simply put, the processor or CPU (Central Processing Unit) is the brains of your build. The motherboard CPU Socket type will determine if your processor will fit the board. Depending on if it is a board built to support Intel or AMD, the socket will vary because both are not created (or named) the same.
Common socket types listed from newer to older for Intel are;
- LGA 2066 (Intel’s 7th generation (Skylake-X & Kaby Lake-X) series of Core-X processors)
- LGA 1151 (Intel’s 6th generation (Skylake), 7th generation (Kaby Lake), 8th generation (Coffee Lake) processors, and 9th generation (Coffee Lake) processors)
- LGA 1150 (Intel’s 4th generation Haswell, Haswell Refresh, and Broadwell processors)
- LGA 2011 (Intel’s Sandy Bridge and Ivy bridge for i7 and Xeon Processors)
- LGA 1155 (Intel’s Mainstream processor support for Sandy bridge and Ivy bridge)
Common socket types listed from newer to older for AMD are;
- sTRX4 (3rd generation Ryzen Threadripper CPUs)
- TR4 (1st and 2nd generation Ryzen Threadripper CPUs)
- AM4 (AMD Ryzen, Athlon with Radeon graphics, and 7th Gen A-Series Processors)
- AM3 (AMD FX Processors)
- AM2+ (AMD A-Series and Athlon Processors)
Chipset – The chipset is a collection of chips on the motherboard that are configured to perform certain tasks with other parts of the computer, and will often determine what CPU can be used, what other hardware may work (or not due to chipset limitations), and other configurations of how the motherboard will work. This is one of the most important parts you must look at to see if your other components will work with the chipset. Here is information on Intel chipsets and AMD chipsets on their respective websites.
Memory – Temporary (RAM – Random Access Memory) or permanent (ROM – Read Only Memory) storage is used to allow other parts of your computer to perform transactions and calculations.
ROM is usually part of the motherboard and is not something you would need to purchase. Items such as your BIOS and System Clock are stored in ROM. There may be other instruction sets also stored in ROM.
RAM is where your money will go and where you have options to decide what you want. There are different speeds, storage sizes, and matching pairs you need to look at. The best place to start making this decision is on the motherboards manufacturer website and take a look at the QVL (qualified vendors list) or similar documentation to see what RAM should definitely work on the board.
Graphics – Graphics control how you see the what your computer is processing. Some motherboards have on-board graphics which requires CPU supported graphics and/or slots for a dedicated graphics card. How your graphics are provided, greatly influences the performance of games, movies, photo editing and other graphics-intensive tasks.
This specification on the motherboard will generally tell you what connections you have to connect monitors (VGA, DVI, DP, HDMI) what “max” resolution is available (and pretty much everything below it) and if it has on-board CPU supported integrated graphics.
If the motherboard has expansion slot(s) for a dedicated graphics card, then this information will come from the card, and not the motherboard. If no on-board graphics are available, it will likely say “none”, and the purchase of a dedicated card is required.
**Note** Game performance and higher FPS with multiple cards is not guaranteed. I personally suggest one good graphics card for gaming. This is especially true since nVidia 3000 series cards and AMD 6000 GPU’s. Older generations can be used for CrossfireX (AMD) or SLI (nVidia) configurations with multiple GPU’s, if the motherboard supports it.
Multi GPU Support – Many gaming and enthusiast motherboards come with multiple slots for dedicated graphics cards that can be linked together to work as one. AMD’s version of this technology is called “CrossfireX”, while Nvidia’s (originally designed for Intel computers) is called SLI – Scalable Link Interface.
Nowadays, many boards can accommodate both technologies so that’s great for us DIY builders. It gives us more options. But, if you plan to use more than one graphics card – no matter which flavor (AMD or Nvidia) – you MUST use two or more of the exact same type of graphics card. So all 2080’s, or 5700’s or whatever you want. The manufacturer does not matter, but the model/series does! You cannot use one AMD based card with one Nvidia card. **Note** Game performance and higher FPS with multiple cards is not guaranteed. I personally suggest one good graphics card for gaming, starting with the nVidia 3000 series or AMD 6000 series cards.
Expansion Slots – This specification indicates what type of internal expansion slots are available and how many. Usually the capable speeds of these slots are listed. For example; 1 PCIe 3.0/2.0 x16, 1 PCIe 3.0/2.0 x4, etc. DIY builders are most interested in the x16 for single graphics card, while those that would like to SLI or CrossfireX multiple cards, they would be interested in how many slots there are and at what speeds when combined they will run at.
Storage – This specification will provide information about what type of storage mediums the motherboard and chipset will support. If it can work with the newer M.2 storage, or SATA connections and at which speed they could operate at. SATA connections work with both SSD and HDD storage mediums, though one is much faster and reading and writing than the other. SSD is always better for speed, while HDD can usually hold much more data, but at slower R/W speeds. Many choose a combination of both, to enjoy the best of what each has to offer.
LAN – This specification lists available LAN – Local Area Network – speed and type. If available, it may also specify multiple LAN ports or if there is built-in Wireless LAN capabilities.
USB – Depending on the chipset, case and motherboard connections, this specification should list what version(s) of USB (3.1, 3.0, 2.0, etc) the motherboard will support and it may list how many of each type of connection.
Internal Connectors – For DIY builders, this information is sometimes critical information. It lists the details of the types on connectors available on the motherboard. Different power connections, headers for sound, case controls, lighting, temperatures, fan connections, etc. The list can be quite large. Pay attention to the ones important for you to have in your build, or you might need to purchase adapters and extra hardware to accommodate your needs.
External Connectors – Generally these specifications list the connections that are located in the back of the computer where the “back plate” is installed. Connections such as LAN, audio, microphone, USB ports, mouse/keyboard serial ports, and monitor connections (for on-board graphics capable boards only).
Additional Items Included – Many new motherboards come with a bunch of additional items in the box, such as the I/O backplate (if you don’t get one of these in the box, you might want to contact the provider or manufacturer about that!), motherboard drivers CD, maybe a CD with software from the manufacturer for configuring your motherboard or controlling your CPU, RAM, fans, etc. You will likely find risers, screws, clips, SATA cables and other goodies – all usually required parts to installing your new motherboard.
Form Factor – The Form Factor of your motherboard is essentially the footprint spec or size of the area the motherboard will occupy. This is one of the things that will determine what size or kind of case you decide to make your build in.
The four most common sizes of motherboard from biggest to smallest are; E-ATX, ATX (standard), micro ATX, and mini ITX. Most [gaming] builds will go with the ATX boards, since they offer the most options in flexibility, cost, and features, without being monstrous like E-ATX builds. DIY builds that don’t require as much bang might be happy enough going with a micro ATX board to save on space the computer will absorb from your desk real estate.
Power Supply Specifications
Making sure you have enough stable power for your computer build is crucial to making it work as intended. The more “stuff” you put into your PC, the more power you’ll need to provide.
Recommendations
This is not a definitive list, but it is a rule of thumb for how much minimum power you should provide for your computer build based on smallest to largest demand;
- Small Form Factor – 15A (250W)
- Mini-Tower – 25A (300-350W)
- Mid-Tower – 35A (400-500W)
- Full Tower – 40A (600-650W)
- Dual Video Card (SLI/CrossfireX) – 50A (750W+)
- Latest gen Graphics and CPU are quite power hungry. I would recommend 850-1000w power supply
As stated in other areas of this website, you want to make your computer as future expandable as you can. Even if you don’t need all that power right now, if you think you might dabble in buying a second graphics card or add other hardware down the road (such as more fans, Blu-ray drive, additional storage, lighting, other expansion cards, watercooling, etc.) you should definitely buy something that gives you room for that expansion.
Most of my own mainstream gaming builds have always gone with a 700W+ power supply. Look at pricing too. Sometimes you can get a great deal on something that can provide more power. Why not get it? If I can find a 600W power supply for $80.00, but come across another I like that is 900W for $100.00 but there is a $20 mail-in rebate, why wouldn’t I (or you) grab that? I’ll get off my soap box now and move on.
Power Supply Ratings of Bronze, Silver, Gold
While shopping for your computer power supply, you will likely run into jargon and ratings statements for levels of bronze, silver, gold, and even platinum and titanium. Holy cow, really? So what does it all mean?
An 80% plus or 80+ certified power supply is a minimum standard for energy efficiency ratings. If you get anything that isn’t truly rated, or at least 80% (and you check that it’s actually certified), then you are spending electric $$$ wastefully. The lower the ratings, the lower the efficiency of the power supply. You will be paying more to run your computer as a heat source, rather than what you intended it for.
The difference of the Bronze, Silver, Gold, Platinum and Titanium ratings in power supplies is simply how well it uses the electricity to provide power (rather than wasted heat) at various load levels. The higher ratings usually run about 90% efficiency, while the lower Bronze, Silver and Gold run between 80% and 90%.
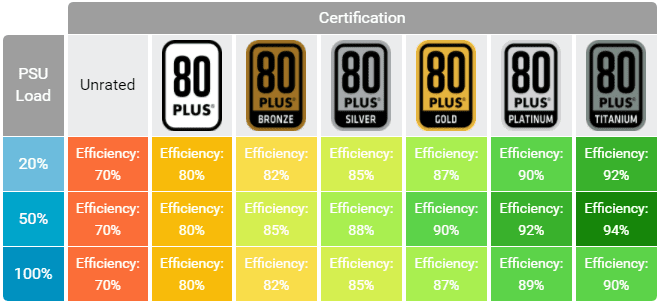
So, the simple answer here is to go with a power supply that slightly (or more if you choose) exceeds your minimum recommendation needs, and most certainly get one that is truly 80% certified or above! The label of Bronze, Silver or Gold should only matter to those who want to pinch every penny out of their electric bill.
CPU/Processor Specifications
Most importantly, you need to know your processors brand, model, series, and socket to dig deeper into their capabilities and specifications. Knowing what your motherboard will support, helps in deciding on a CPU for your build.
Intel and AMD each have different naming conventions for their processors, but the general idea behind those conventions is that a “higher number” usually means it is a better class of processor.
For Intel, we have i3, i5, i7 and i9 series processors. i3 being the least capable of the group and the i9 as being the top dog. Intel also has a numbering sequence to their CPU’s, so within a series, they also have a model number, such as 3600, 4600, 5600, etc. Again, the higher the number, the more capable the processor is in that group. There are also Celeron and Pentium processors by Intel, but we will not dive into them here. The latest generation of Intel processors is 13th Gen or 13XXX.
With AMD processors, they usually follow a similar convention. Today we have the Ryzen series processors available as simply Ryzen 3, 5, 7 or 9. They also have the Threadripper which resides at the top of the line and does not follow the typical “numbering” method, but the models do. So as model numbers are higher such as 5400, 5500, 5600, 5700 and so on, the higher ones indicate a stronger processor. Currently, AMD is producing it’s 6th gen (Zen 4) 7000 series CPUs.
One of the most important items to note, is what CPU socket your motherboard has. Also check your motherboard manufacture’s website to ensure the processor is on the list of ones that will work with that specific board. You will save yourself lots of time, frustration, and money knowing these details. You don’t want to buy one that “fits” only to find out it doesn’t “work”!
Other specifications for your processor will include processing speed, usually measured in Hertz or Mhz, Ghz, etc. It should also tell you the levels of on-chip memory it has, such as L1, L2, or L3 cache and how much in each, such as 64Mb, 128Mb, 512Mb, etc. The more memory built into the processor, the quicker it can perform without having to reach out to your system memory to do lots of small calculations or commands.
Lastly, as mentioned in other sections throughout this site, a CPU can provide graphics capabilities. Be aware that the motherboard chipset AND CPU must support this feature for it to work. For most gamer builds, a dedicated graphics card is the way to go. But, for more mainstream use, onboard graphics are usually pretty good these days, saving a typical user lots of money.